'Programming'에 해당하는 글 384건

Apache POI 는 MS office 문서포맷을 Java 로 사용할 수 있는 API 를 제공한다.

보통 WorkBook 으로 문서를 만드는 예제나, 암호화된 문서의 암호를 삭제시킬 수 있는 예제들이 떠돌고 있다.


MultipartFile 로 엑셀파일 전달 받고, 해당 파일에 암호 설정해서 돌려주는 API 를 만들어 봤다.


 Gradle 


dependencies {
    implementation 'org.apache.poi:poi:5.2.2'
    implementation 'org.apache.poi:poi-ooxml:5.2.2'
}


 Java 


@PostMapping("/excel/encrypt")
public ResponseEntity<ByteArrayResource> excelEncrypt(@RequestParam MultipartFile file) {

    String[] extensionArr = {"xls", "xlsx"};  // 97~, 2007~
    String[] mimeTypeArr = {"application/vnd.ms-excel", "application/vnd.openxmlformats-officedocument.spreadsheetml.sheet"};
    // 파일검증 생략

    // apache poi 엑셀 암호화
    ByteArrayOutputStream byteArrayOutputStream = new ByteArrayOutputStream();
    try (POIFSFileSystem fs = new POIFSFileSystem()) {
        EncryptionInfo encryptionInfo = new EncryptionInfo(EncryptionMode.agile);

        Encryptor encryptor = encryptionInfo.getEncryptor();
        encryptor.confirmPassword("password!@#$");

        try (OPCPackage opc = OPCPackage.open(file.getInputStream());
             OutputStream outputStream = encryptor.getDataStream(fs)) {
            opc.save(outputStream);
        }
        fs.writeFilesystem(byteArrayOutputStream);
        byteArrayOutputStream.close();
    } catch (Exception e) {
        logger.info(e.getMessage());
    }

    HttpHeaders header = new HttpHeaders();
    String encFileName = URLEncoder.encode(file.getOriginalFilename(), StandardCharsets.UTF_8).replace("+", "%20");
    header.setContentType(MediaType.parseMediaType(file.getContentType())); // <- 지정하지 않아도 무관
    header.set(HttpHeaders.CONTENT_DISPOSITION, "attachment; filename*=utf-8''enc_" + encFileName);

    return new ResponseEntity<>(new ByteArrayResource(byteArrayOutputStream.toByteArray()),
                    header, HttpStatus.OK);
}


POIFS (Poor Obfuscation Implementation File System)
 - MS Office 의 OLE 2 Compound document 파일 포맷을 읽고 쓰는 컴포넌트. 
 - 모든 오피스 파일 포맷은 OLE2 방식이므로 하위 모든 컴포넌트의 기반이 된다.
HSSF (Horrible SpreadSheet Format)
 - MS excel 97 이후로 현재까지의 엑셀파일들에 읽고 쓰기를 지원하는 컴포넌트.
XSSF (XML SpreadSheet Format)
 - MS excel 2007 이후의 오픈 XML 파일 포맷인 *.xlsx 파일을 읽고 쓰는 컴포넌트.


음~ 잘된당~

용량을 10M 정도 넘겨봤더니, 에러 발생. 늘려보려 했는데... 실패!


Tried to allocate an array of length 132,636,469, but the maximum length for this record type is 100,000,000.
If the file is not corrupt or large, please open an issue on bugzilla to request 
increasing the maximum allowable size for this record type.
As a temporary workaround, consider setting a higher override value with IOUtils.setByteArrayMaxOverride()

WRITTEN BY
손가락귀신
정신 못차리면, 벌 받는다.

,

CORS error

Programming/Spring Boot 2022. 3. 10. 21:13

CORS(Cross-Origin Resource Sharing)는 웹 브라우저에서 특정 사이트(A.com) 로부터 다른 사이트(B.com) 로의 요청 및 접근을 가능하게 하는 프로토콜이다. 보안 상 최신 브라우저는 기본적으로 타 사이트로의 요청을 제한하고 있다. SPA 프레임워크의 사용 등으로 frontend 와 backend 의 분리가 일반적이 된 요즘, 서버로의 API 요청시 프로토콜/도메인/포트 등이 다르다면, CORS 설정이 올바르지 않다면 브라우저 콘솔에서 관련 error 를 마주하게 된다.


Access to XMLHttpRequest at 'http://localhost:8080/account/signin' from origin 'http://localhost:3000' has been blocked by CORS policy: Response to preflight request doesn't pass access control check: No 'Access-Control-Allow-Origin' header is present on the requested resource.


기본적인 CORS 요청들을 단순(simple) 요청이라 할 때, application/json 타입의 요청이거나 커스텀 헤더를 전송하는 등의 요청은 사전(preflight) 요청이라고 한다. 이 경우는 웹 브라우저에서 OPTIONS 메소드로 preflight(사전전달) 요청이 먼저 수행하고, 서버에서 허용 범주를 응답 받은 후에 실제 GET/POST 등의 요청을 보내게 된다.


preflight


CORS 서버 설정


서버 개발자는 요청을 허용할 범주(Access-Control-Allow-* header/method/origin) 를 설정하여 응답 헤더에 보낼 수 있도록 세팅하면 된다. Spring Boot 의 경우, WebMvcConfigurer 를 구현하고 addCorsMappings 메소드를 오버라이드 하여 아래와 같이 설정할 수 있다.


@Configuration
public class WebConfig implements WebMvcConfigurer {
    @Override
    public void addCorsMappings(CorsRegistry registry) {
        registry.addMapping("/**")
                .allowedOrigins("http://localhost:3000", "http://localhost:8081")
                .exposedHeaders("Authorization");
    }
}


exposedHeaders 메소드의 경우 브라우저에서 클라이언트가 접근 가능한 응답 헤더 목록을 설정한다. (Authorization 은 token 등을 이용할 때 많이 사용) cors mapping 만 설정했을 때는 GET, HEAD, POST 의 메소드에 대해서, 모든 출처의 요청에 대해 허용하는 것이 기본값이다. 위와 같이 Spring 에서 설정했을 경우, 아래와 같은 응답 헤더를 보내주고 CORS 는 성공하게 된다.


Access-Control-Allow-Headers: content-type
Access-Control-Allow-Methods: GET,HEAD,POST
Access-Control-Allow-Origin: http://localhost:3000
Access-Control-Expose-Headers: Authorization


컨트롤러, 메소드 단위에서 @CrossOrigin 어노테이션을 사용할 수도 있다.


또한, Spring Security 를 사용중이라면 아래와 유사한 방식으로 cors 요청을 처리할 수 있다.


@EnableWebSecurity
public class WebSecurityConfig extends WebSecurityConfigurerAdapter {
    @Override
    protected void configure(HttpSecurity http) throws Exception {
        http.authorizeRequests()
            .and()
            .cors()
            .and()...
    }

    @Bean
    public CorsConfigurationSource corsConfigurationSource() {
        CorsConfiguration configuration = new CorsConfiguration();

        configuration.addAllowedOrigin("http://localhost:3000");
        configuration.addAllowedHeader("*");
        configuration.addAllowedMethod("*");
        configuration.setAllowCredentials(true);

        UrlBasedCorsConfigurationSource source = new UrlBasedCorsConfigurationSource();
        source.registerCorsConfiguration("/**", configuration);
        return source;
    }
}


WRITTEN BY
손가락귀신
정신 못차리면, 벌 받는다.

,

Spring Boot 에서 모든 원본 Http request 와 response 에 대한 log 를 기록하려고 한다.


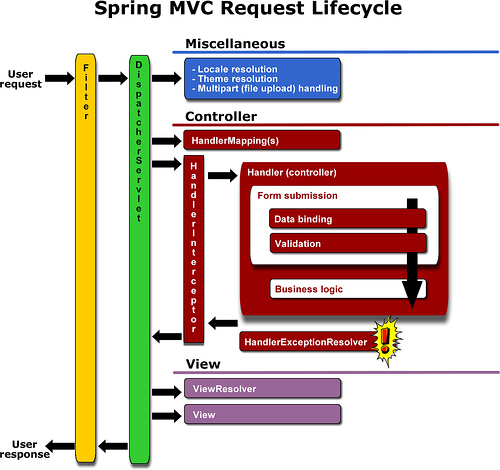
요청 → Filter → Interceptor → AOP → Interceptor → Filter → 응답 의 처리 순서로 볼 때, 가장 원시적인 요청 본문과 응답 본문을 캐치할 수 있는 부분은 Filter 였다. 요청을 받자마자 Filter 에서 본문을 로깅하고, 응답 직전에 본문을 로깅하고... 하지만 이거슨 순수한 나만의 착각?


spring-mvc-request-lifecycle


Request / Response body 로깅 목표와... 결과

  • 비정상 요청 파악 및 비정상 응답 파악하기.
  • 최대한 원시 본문을 유지할 것. (의미를 찾지못함;)
  • 요청 본문과 응답 본문의 로깅을 각각 처리. (막상 분리하고 나니 굳이...)
  • POST 메소드만 처리.
  • form-urlencoded 와 application/json 모두 처리.
  • 로깅 위치는 Filter 와 Interceptor 의 preHandle 과 afterCompletion 를 적절히 사용.


1. request / response 본문(body) 읽기


request 와 response 의 본문(body) 를 로깅하기 위해 HttpServletRequest 의 getReader() 나 getInputStream() 등을 통해서 읽어낼 경우, 다음 단계에서 이 본문들은 비어있는 상태가 된다. 인터셉터에서 request 본문을 읽는다면 컨트롤러에 파라미터가 전달되지 않을 것이고, 인터셉터에서 response 본문을 읽는다면 클라이언트에 내용이 빈 상태로 응답될 수 있다. 이를 방지하기 위해 사용하는 방법이 여러가지 있는데 난 그 중에서 ContentCachingRequestWrapper / ContentCachingResponseWrapper 클래스를 선택했다.


2. ContentCachingRequestWrapper / ContentCachingResponseWrapper


ContentCachingRequestWrapper 는 getReader() 나 getInputStream() 등을 통해서 읽은 요청 본문을 캐시하고 byte array 로 이를 읽을 수 있게 하는 HttpServletRequest 래퍼이다. ContentCachingResponseWrapper의 경우 Body를 돌려주기 위해 copyBodyToResponse method를 호출해줘야 한다.


아래는 filter 파일 하나에 전부 때려넣은 예제이다.


@Component
public class LoggingFilter implements Filter {

    private final Logger logger = LoggerFactory.getLogger(this.getClass());

    @Override
    public void doFilter(ServletRequest servletRequest, ServletResponse servletResponse, FilterChain chain)
            throws IOException, ServletException {

        if (servletRequest instanceof HttpServletRequest && servletResponse instanceof HttpServletResponse) {
            HttpServletRequest request = (HttpServletRequest) servletRequest;
            HttpServletResponse response = (HttpServletResponse) servletResponse;

            HttpServletRequest requestToCache = new ContentCachingRequestWrapper(request);
            HttpServletResponse responseToCache = new ContentCachingResponseWrapper(response);

            chain.doFilter(requestToCache, responseToCache);

            logger.info("request header: {}", getHeaders(requestToCache));
            logger.info("request body: {}", getRequestBody((ContentCachingRequestWrapper) requestToCache));
            logger.info("response body: {}", getResponseBody(responseToCache));
           
        } else {
            chain.doFilter(servletRequest, servletResponse);
        }
    }

    private Map<String, Object> getHeaders(HttpServletRequest request) {
        Map<String, Object> headerMap = new HashMap<>();

        Enumeration<String> headerArray = request.getHeaderNames();
        while (headerArray.hasMoreElements()) {
            String headerName = headerArray.nextElement();
            headerMap.put(headerName, request.getHeader(headerName));
        }
        return headerMap;
    }

    private String getRequestBody(ContentCachingRequestWrapper request) {
        ContentCachingRequestWrapper wrapper = WebUtils.getNativeRequest(request, ContentCachingRequestWrapper.class);
        if (wrapper != null) {
            byte[] buf = wrapper.getContentAsByteArray();
            if (buf.length > 0) {
                try {
                    return new String(buf, 0, buf.length, wrapper.getCharacterEncoding());
                } catch (UnsupportedEncodingException e) {
                    return " - ";
                }
            }
        }
        return " - ";
    }

    private String getResponseBody(final HttpServletResponse response) throws IOException {
        String payload = null;
        ContentCachingResponseWrapper wrapper = WebUtils.getNativeResponse(response, ContentCachingResponseWrapper.class);
        if (wrapper != null) {
            wrapper.setCharacterEncoding("UTF-8");
            byte[] buf = wrapper.getContentAsByteArray();
            if (buf.length > 0) {
                payload = new String(buf, 0, buf.length, wrapper.getCharacterEncoding());
                wrapper.copyBodyToResponse();
            }
        }
        return null == payload ? " - " : payload;
    }
}


/*
2022-03-01 01:37:04.049  INFO 16344 --- [nio-8080-exec-6] com.example.api.filter.LoggingFilter     : request header: {content-length=51, postman-token=d4e2bfa4-1...
2022-03-01 01:37:04.050  INFO 16344 --- [nio-8080-exec-6] com.example.api.filter.LoggingFilter     : request body: {
    "param1": "test1",
    "param2": "test2"
}
2022-03-01 01:37:04.051  INFO 16344 --- [nio-8080-exec-6] com.example.api.filter.LoggingFilter     : response body: {"res1":"test1","res2":"test2","res3":"test3"}
*/


Filter 에서 ContentCachingRequestWrapper / ContentCachingResponseWrapper 래퍼로 request 와 response 를 캐시하여, 재사용이 가능하도록 하였다. 밑에 메소드 3개는 각각 헤더, 요청 본문, 응답 본문 가져오기.


이렇게 ContentCaching* 클래스로 간단하게 요청/응답 본문을 로깅할 수 있었다. 심플한건 좋았지만, 내가 원했던 방법은 이렇게 filter 에 전부 때려박는 것은 아니었다. 요청 본문은 preHandle 에서 로깅하고 싶었는데, 제약 조건이 많았다. preHandle 에서 ContentCachingRequestWrapper 로는 json 을 처리하지 못했다. 하지만 form-urlencoded 요청의 경우, application.properties 에서 logging.level.org.springframework.web=debug 설정이 되어 있다면, 인터셉터 preHandle 에서도 요청 본문 로깅이 가능했다. Exception 발생시 응답 본문은 null 이 발생했으나, 이 경우 상태 코드로 응답 예측이 가능하니 큰 문제는 없었다. multipart/form-data 요청은 용량 차지하지 않게 별도로 알아서 잘 처리하시고... (난 그냥 본문 날려버렸음.)


굳이 Spring 에서 처리하긴 했지만, 로깅을 커스텀 하는 것은 쉽지 않았다. 어떤 서비스에 어떤 목적으로 어디에 로깅을 하느냐 또 그 로깅을 어떻게 활용할 것인가가 중요한 것 같다.


WRITTEN BY
손가락귀신
정신 못차리면, 벌 받는다.

,

Spring API 프로젝트에서 공통적인 에러 코드로 응답하기.


API 개발시 어떠한 처리 결과에도 동일한 포맷의 응답(response) 을 리턴하는 것은 중요하다. 아래는 가장 간단한 예이다.


{
    "code": 200,
    "message": "ok",
    "result": {}
}


code / message 로 미리 정의된 응답 코드와 메시지를 확인할 수 있고, 정상적으로 처리가 되었을 경우 result 에서 결과를 확인할 수 있다. 디테일이 필요하다면 더 다양한 코드에 상세한 설명을 넣으면 되고, 보안을 강화한다면 메시지를 없앨 수도 있다. 이러한 공통적인 포맷을 Spring 에서 구현하는 방법을 살펴 보았다.


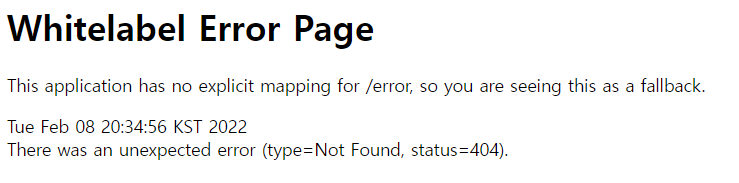
1. whitelabel 에러 페이지


Spring Boot 는 기본적으로 text/html 타입의 요청에 대해 whitelabel 이라는 오류 페이지를 제공한다. 기존 톰캣의 보라색 에러 페이지 보다는 괜찮아 보일 수 있다.


whitelabel-spring


브라우저에서 접속했을 때에도 에러 페이지를 커스텀 하려면 properties 파일에서 whitelabel 페이지를 비활성화 하고 에러 페이지를 재정의해야 한다.


# application.properties
server.error.whitelabel.enabled=false


2. 기본 json 에러 응답


Spring Boot 는 기본적으로 RESTful 이나 application/json 타입의 요청에 대해 basicErrorController 로부터 아래와 같은 포맷으로 응답한다.


{
    "timestamp": "2022-02-15T04:28:46.310+00:00",
    "status": 404,
    "error": "Not Found",
    "path": "/a"
}


위 속성은 DefaultErrorAttributes 에서 정의되는데 속성만 추가하려면 application.properties 에서 server.error 옵션들을 수정하던지 DefaultErrorAttributes 를 상속하여 커스텀 할 수도 있다.


# message 항목 보이기
server.error.include-message=always


@Component
public class CustomErrorAttributes extends DefaultErrorAttributes {

    @Override
    public Map<String, Object> getErrorAttributes(WebRequest webRequest, ErrorAttributeOptions options) {
        Map<String, Object> result = super.getErrorAttributes(webRequest, options);
        result.put("description", "abcdefg");
        return result;
    }
}


3. AbstractErrorController 상속하여 재정의


basicErrorController 처럼 ErrorController 인터페이스를 구현한 AbstractErrorController 를 상속하여 에러 응답을 재정의할 수 있다.


@RestController
@RequestMapping("${server.error.path:${error.path:/error}}")
public class CustomErrorController extends AbstractErrorController {

    public CustomErrorController(ErrorAttributes errorAttributes) {
        super(errorAttributes);
    }

    @RequestMapping
    public ResponseEntity<ErrorMessageEntity> customError(HttpServletRequest request) {
        HttpStatus httpStatus = getStatus(request);

        CustomResponseEntity customResponseEntity = new CustomResponseEntity();
        customResponseEntity.setCode(httpStatus.value());
        customResponseEntity.setMessgae(httpStatus.getReasonPhrase());
        customResponseEntity.setResult(null);

        return new ResponseEntity<>(customResponseEntity, httpStatus);
    }
}


@Entity
public class CustomResponseEntity {
    private Integer code;
    private String messgae;
    @JsonInclude(JsonInclude.Include.NON_NULL)
    private String result;
    ...
}


기본 에러 경로인 /error (properties 파일: server.error.path) 는 basicErrorController 에서 매핑을 시도하므로, ErrorController 인터페이스를 구현하지 않고 /error 컨트롤러를 사용한다면 런타임 에러가 발생한다.


Caused by: java.lang.IllegalStateException: Ambiguous mapping. Cannot map 'basicErrorController' method


4. ResponseStatusException 사용


위와 같이 AbstractErrorController 를 상속하면 모든 HTTP 상태 코드에 대한 응답을 커스텀 할 수 있다. 여기에 Spring 5+ 를 사용 중이라면 RuntimeException 을 상속하는 ResponseStatusException 를 이용해 어디에서든 원하는 에러를 발생시킬 수 있다.


throw new ResponseStatusException(HttpStatus.BAD_REQUEST, "Invalid path");


특정 상황에 특정 에러 코드와 메시지로 응답하고 싶었는데 2번째 파라미터를 응답 엔티티에 넣는 것이 쉽지 않았다.


5. Custom Exception 생성


ResponseStatusException 을 대신하여 메시지도 응답할 수 있도록 CustomException 을 생성한다.


@Component
public class CustomException extends RuntimeException {

    private ErrorCode errorCode;

    public CustomException(ErrorCode errorCode) {
        this.errorCode = errorCode;
    }

    public ErrorCode getErrorCode() {
        return this.errorCode;
    }
}


에러 메시지를 enum 으로 정리한다.


public enum ErrorCode {
    
    EXPIRED_TOKEN(HttpStatus.UNAUTHORIZED, "Expired Token"),
    INVALID_TOKEN(HttpStatus.UNAUTHORIZED, "Invalid Token"),
    SERVER_ERROR(HttpStatus.INTERNAL_SERVER_ERROR, "Internal server error"),
    ...
    ;

    private final HttpStatus status;
    private final String message;

    ErrorCode(HttpStatus status, String message) {
        this.status = status;
        this.message = message;
    }

    public HttpStatus getStatus() {
        return this.status;
    }

    public String getMessage() {
        return this.message;
    }
}


컨트롤러 전역에서 에러를 핸들링할 수 있도록 @ControllerAdvice, @ExceptionHandler 를 작성한다.


@ControllerAdvice
public class GlobalExceptionHandler {

    @ExceptionHandler(CustomException.class)
    public ResponseEntity<CustomResponseEntity> myCustomException(CustomException ex) {
        CustomResponseEntity customResponseEntity = new CustomResponseEntity();

        ErrorCode errorCode = ex.getErrorCode();
        customResponseEntity.setCode = errorCode.getStatus().value();
        customResponseEntity.setMessage = errorCode.getMessage();

        return new ResponseEntity<>(customResponseEntity, errorCode.getStatus());
    }
}


특정 코드에 에러 발생시키기.


throw new CustomException(EXPIRED_TOKEN);

// output
{
    "code": 401,
    "message": "Expired Token"
}


6. 404 error 핸들러 추가


여기까지 하면 404 에러 발생시 에러 핸들러를 찾을 수 없다는 500 에러가 발생하게 되는데, dispatcher servlet 에서 요청을 처리할 수 없는 핸들러가 생긴다면 NoHandlerFoundException 예외를 발생시키도록 아래와 같이 수정한다.


# application.yaml
spring:
  mvc:
    throw-exception-if-no-handler-found: true
  web:
    resources:
      add-mappings: false


위 5번 GlobalExceptionHandler 에 아래 NoHandlerFoundException 추가하여 NoHandlerFoundException 예외를 처리한다.


@ExceptionHandler(NoHandlerFoundException.class)
public ResponseEntity<DefaultMessageEntity> handle404(NoHandlerFoundException ex) {
    CustomResponseEntity customResponseEntity = new CustomResponseEntity();
    customResponseEntity.setCode = HttpStatus.NOT_FOUND.value();
    customResponseEntity.setMessage = HttpStatus.NOT_FOUND.getReasonPhrase()

    return new ResponseEntity<>(customResponseEntity, HttpStatus.OK);
}


CustomException(EXPIRED_TOKEN) 이라는 에러를 발생시키면, @ExceptionHandler 에서 해당 예외를 처리하는 예제이다. CustomException 을 제외한 예외들은 3번에서 작성한 CustomErrorController 에 의해 처리될 것이다. 3번 5번 6번 조합!


WRITTEN BY
손가락귀신
정신 못차리면, 벌 받는다.

,

데이터베이스에서 replication 은 데이터베이스간의 데이터 복제를 의미한다. 하나의 데이터베이스에서 읽기와 쓰기 작업을 동시에 진행할 경우 병목 현상이 발생할 확률이 높다. 이를 방지하기 위해 흔히 Master(Write) 와 Slave(Read) 로 나누어, Master 에서 변경된 데이터를 Slave 로 복제하는 것을 replication 이라고 한다.


Java 어플리케이션에서 분기 처리하는 방법은 커넥션 풀(DataSource) 을 Master 와 Slave 로 나누어 주고, JDBC 의 Connection.setReadOnly 메소드나 Spring 의 @Transactional 를 사용하는 것이다.


Spring Boot 에서의 read / write 분기 처리


1. DB 설정 (application.yml)


spring:
  datasource:
    master:
      hikari:
        driver-class-name: com.mysql.cj.jdbc.Driver
        url: jdbc:mysql://dev.cluster-abc.rds.amazonaws.com:3306/kps
        read-only: false
        username: username
        password: password

    slave:
      hikari:
        driver-class-name: com.mysql.cj.jdbc.Driver
        url: jdbc:mysql://dev.cluster-ro-abc.rds.amazonaws.com:3306/kps
        read-only: true
        username: username
        password: password


2. DataSource Bean 등록


@Configuration
public class DataSourceConfiguration {

    @Bean
    @ConfigurationProperties(prefix = "spring.datasource.master.hikari")
    public DataSource masterDataSource() {
        return DataSourceBuilder.create()
                .type(HikariDataSource.class)
                .build();
    }

    @Bean
    @ConfigurationProperties(prefix = "spring.datasource.slave.hikari")
    public DataSource slaveDataSource() {
        return DataSourceBuilder.create()
                .type(HikariDataSource.class)
                .build();
    }
}


3. AbstractRoutingDataSource 구현

: Read-Write 가 동시에 필요하거나 복제 지연으로의 이슈를 막기 위해 AbstractRoutingDataSource 구현.


public class routingDataSourceImpl extends AbstractRoutingDataSource {
    @Override
    protected Object determineCurrentLookupKey() {
        return (TransactionSynchronizationManager.isCurrentTransactionReadOnly()) ? "slave" : "master";
    }
}


4. Lazy 설정

: LazyConnectionDataSourceProxy 설정으로 실제 쿼리 직전에 connection 을 생성하여 불필요한 커넥션 점유 방지.


@Configuration(proxyBeanMethods = false)
public class DataSourceConfiguration {

    @Primary
    @Bean
    public DataSource dataSource(@Qualifier("routingDataSource") DataSource routingDataSource) {
        return new LazyConnectionDataSourceProxy(routingDataSource);
    }

    @Bean
    public DataSource routingDataSource(@Qualifier("masterDataSource") DataSource masterDataSource,
                                        @Qualifier("slaveDataSource") DataSource slaveDataSource) {
        RoutingDataSourceImpl routingDataSourceImpl = new RoutingDataSourceImpl();
        Map<Object, Object> targetDataSource = new HashMap<>();
        targetDataSource.put("master", masterDataSource);
        targetDataSource.put("slave", slaveDataSource);
        routingDataSourceImpl.setTargetDataSources(targetDataSource);
        routingDataSourceImpl.setDefaultTargetDataSource(masterDataSource);
        return routingDataSourceImpl;
    }

    @Bean
    @ConfigurationProperties(prefix = "spring.datasource.master.hikari")
    public DataSource masterDataSource() {
        return DataSourceBuilder.create()
                .type(HikariDataSource.class)
                .build();
    }

    @Bean
    @ConfigurationProperties(prefix = "spring.datasource.slave.hikari")
    public DataSource slaveDataSource() {
        return DataSourceBuilder.create()
                .type(HikariDataSource.class)
                .build();
    }
}


5. @Transactional 명시


@Service
public class ExampleService {

    ...

    @Transactional(readOnly = true)
    public List<ExampleEntity> getList() {
        return exampleRepository.getList();
    }

    @Transactional  // default : readOnly = false
    public Integer insertExample() {
        return exampleRepository.insertExample();
    }
}


6. 테스트


위의 코드를 예로 들면 updateExample() 를 실행하여 데이터 삽입을 확인하고, 

getList() 를 실행했을 때 slave dataSource 가 구성되며 삽입한 데이터가 출력되면 성공.


...
HikariPool-1 - configuration:
HikariPool-1 - Starting...
...
HikariPool-2 - configuration:
HikariPool-2 - Starting...
...


WRITTEN BY
손가락귀신
정신 못차리면, 벌 받는다.

,