API 가 딱 한 개만 필요하다면... 어떤 방법으로 api 서버를 구축하는 것이 좋을까. ec2 + framework 는 생각만 해도... 생각하고 싶지도 않고... 역시나 API Gateway + Lambda 이다. DB(Mysql) 에 insert 할 api 를 하나 만들어야 하는 상황인데... API Gateway 로 요청 받고 람다를 실행시켜서 DB에 insert 시킨 후 응답해 주면 완료...
1. API Gateway
- API 타입 http-api, rest-api 중 요청 제한을 위해 적어도 api-key 정도는 설정하는 것이 좋겠다. http-api 는 api-key 를 지원하지 않으므로 rest-api 선택. (그 외에도 res-api 를 선택할 이유는 많지만, 정말 아~무것도 필요없다면 http-api 쓰면 됨.)
- resource 에서 경로 만들고 요청 메서드 하나 만들고 api key 췍~ 스테이지 배포 후 API 키 / 실행 계획 작성 / 스테이지 연결
- api 키는 프론트 요청 헤더(x-api-key) 에 담아서 전달 받으면 됨. 그렇지 않으면 요청 거부됨.'
{
    "message": "Forbidden"
}
2. Lambda Layer
- 람다 함수 런타임은 간단하게 Nodejs 사용할 생각.
- mysql 연결을 위해 mysql2 패키지를 설치해야 하는데 재사용을 위해 레이어를 하나 생성한다.
- 호환 런타임 잘 선택하고, 아래 zip 파일 업로드. (기타 필요한 라이브러리도 설치)
$ mkdir nodejs
$ cd nodejs
$ npm init -y
$ npm install mysql2
$ zip -r mysql2-layer.zip .
nodejs 최신버전의 경우 index.mjs 파일이 생성되므로, ESM 모듈 사용하려면, 압축하기 전에 package.json 에 아래 타입을 명시한다.
{
    "type": "module"
}
require is not defined in ES module scope, you can use import instead 에러 시 참고.
3. Lambda Function
nodejs 람다 함수를 하나 생성하고, 코드 가장 하단 설정에서 위에 업로드 한 layer 를 선택한다. index.mjs 파일 작성 후 배포.
import mysql from 'mysql2/promise';

const pool = mysql.createPool({
  host: 'host',
  user: 'user',
  password: 'password',
  database: 'database',
  port: 'port'
});

export const handler = async (event) => {

  const { id, name } = JSON.parse(event.body);

  try {
    const query = 'INSERT INTO user (id, name) VALUES (?, ?)';

    const [results] = await pool.execute(query, [id, name]);
    return {
      statusCode: 200,
      body: JSON.stringify({ code: 200, message: 'ok', data: results })
    };
  } catch (err) {
    return {
      statusCode: 200,
      body: JSON.stringify({ code: 500, message: 'error: db insert', error: err.message })
    };
  }
};
4. API Gateway - Lambda 연결
API Gateway 해당 리소스의 통합 요청에서 생성한 람다 함수를 연결한다. request payload 를 람다 함수에 전달하기 위해 [Lambda 프록시 통합] 활성화 . 설정 후 [API 배포].
5. 테스트
postman 에서 header 에 api 키를 담아 stage url/resource 경로로 api 테스트를 진행한다.
{
    "code": 200
    "message": "ok",
    "data": {
        "fieldCount": 0,
        "affectedRows": 1,
        "insertId": 0,
        "info": "",
        "serverStatus": 2,
        "warningStatus": 0,
        "changedRows": 0
    }
}
6. 디버깅
만약 정상적인 응답을 받지 못했다면, 스테이지에서 cloudwatch logs 를 켜고, 로그를 확인한다. 처음 실행할 때는 cloudwatch 로깅에 대한 role 이 필요하다. IAM 에서 AmazonAPIGatewayPushToCloudWatchLogs 정책으로 role 하나 만들고, API Gateway 좌측 메뉴 설정에서 해당 role 선택.
7. 게이트웨이 응답
필요시 [게이트웨이 응답] 메뉴에서 request 에러시 응답값을 커스텀 할 수 있다.
8. CORS error
Access to fetch at 'https://11111111.execute-api.ap-northeast-2.amazonaws.com/dev/request' from origin 'http://localhost:8888' has been blocked by CORS policy: Response to preflight request doesn't pass access control check: No 'Access-Control-Allow-Origin' header is present on the requested resource. If an opaque response serves your needs, set the request's mode to 'no-cors' to fetch the resource with CORS disabled.
실전은 다르다. 매번 ok 사인 주는 postman 은 실전과 다르다. 프로젝트 할 때마다 괴롭히는 cors 에러... 메서드 선택 후 CORS 를 활성화 시키면 되구용...
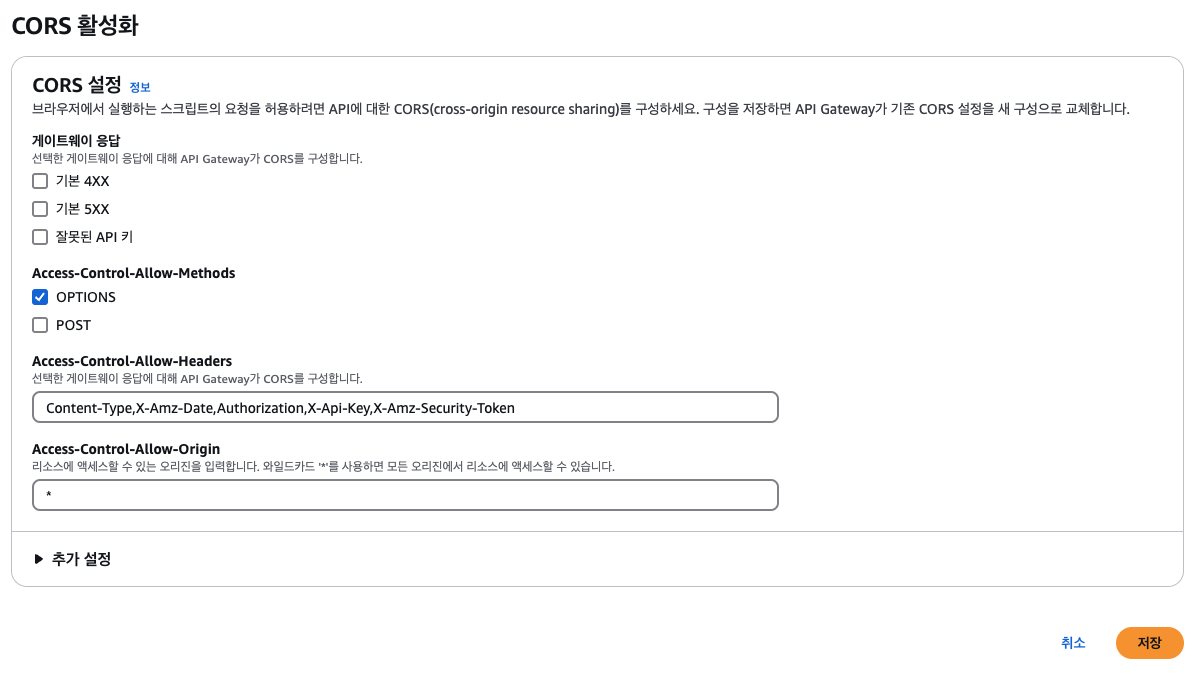
프록시 통합(proxy integrations) 이 설정되었기 때문에, 람다에서의 응답 헤더가 적용된다. 하여 람다에 적절한 응답 헤더가 추가되어야 한다.
return {
  statusCode: 200,
  headers: {
    "Access-Control-Allow-Headers" : "Content-Type,X-Api-Key",
    "Access-Control-Allow-Origin": "*",
    "Access-Control-Allow-Methods": "OPTIONS"
  },
  body: JSON.stringify({ code: 200, message: 'ok', data: results })
};
. 끝 .
WRITTEN BY
- 손가락귀신
정신 못차리면, 벌 받는다.