'spring'에 해당하는 글 4건


eks-vcpu-memory


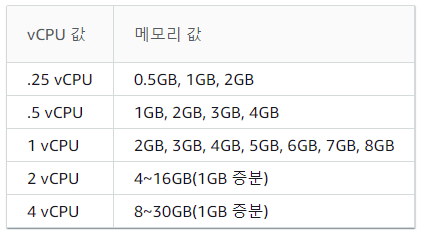
EKS Fargate 를 기본사양으로 약 1달 정도 사용해 봤다. Fargate 의 기본사양(최소사양)은 vCPU 0.25 / memory 0.5GB 이다. 1개의 CPU 코어가 2 vCPU 니까 0.25면... Spring Jar 파일 돌리는데 부팅시 스프링 로그가 2초에 1줄 정도씩 나왔나. 당연히 부팅시간도 상당히 늘어난다. ALB 의 health check 도 길어지고... 부팅된 후에는 Lazy 설정 때문에 Slave DataSource 가 처음 세팅될 때도 10초 이상의 응답으로 Timeout 이 발생하기도 했다. 그것 빼고는 단일 어플리케이션 돌아가는데 큰 문제는 없어보였다. 이것저것 다 빼다보면 어디다 써야할지... t2.nano 보다도 낮은 사양... 우선 xms / xmx 을 확인해 봤다.


public static void main(String[] args) {
    int mb = 1024 * 1024;
    MemoryMXBean memoryBean = ManagementFactory.getMemoryMXBean();
    long xmx = memoryBean.getHeapMemoryUsage().getMax() / mb;
    long xms = memoryBean.getHeapMemoryUsage().getInit() / mb;
    logger.info("xms: {}", xms);
    logger.info("xmx: {}", xmx);
}

// print
xms: 8
xmx: 123


오마이... 저런 단위는 처음보는 수치이다. 이 상태로 잘도 돌아갔다. 일단 컴퓨팅 사양부터 높였다.


vCPU 1개(1000m) 당 : 월 $1.2
memory 1GB 당 : 월 $1.3


pod 를 정의한 deployment yaml 파일에서 cpu 와 memory 를 수정하였다.


spec.containers[].resources.limits.cpu
spec.containers[].resources.limits.memory
spec.containers[].resources.requests.cpu
spec.containers[].resources.requests.memory


$ vi my-deployment.yaml
...
spec:
  containers:
  - name: web
    image: 1234567890.dkr.ecr.ap-northeast-2.amazonaws.com/web:latest
    resources:
      limits:
        cpu: 1
        memory: 2048Mi
      requests:
        cpu: 1
        memory: 2048Mi

$ kubectl describe pods podname -n mynamespace
...
Annotations:          CapacityProvisioned: 0.25vCPU 0.5GB


재배포하였으나 cpu / memory 는 변경되지 않았다. 어딘가에 제한이 걸려있는 느낌.


LimitRange 를 사용하여 namespace 레벨에서 cpu 와 memory 를 설정해 보았다.


$ my-usage-range.yaml
apiVersion: v1
kind: LimitRange
metadata:
  name: low-usage-range
spec:
  limits:
  - max:
      cpu: 2
      memory: 4G 
    min:
      cpu: 1
      memory: 1G
    type: Container
    
$ kubectl apply -f my-usage-range.yaml -n my-namespace


다시 재배포해보니 잘 바뀌었다.


$ kubectl describe pods podname -n mynamespace
...
Annotations:          CapacityProvisioned: 1vCPU 3GB
...
    Limits:
      cpu:     1
      memory:  2048Mi
    Requests:
      cpu:     1
      memory:  2048Mi


뭔가 바뀌었지만 memory 2048Mi 를 설정했는데 3GB 로 세팅됐다. Fargate 는 각 pod 의 메모리 예약에 256MB 를 추가하기 때문에 기본 단위상 1G가 더 늘어났다. 256MB 를 제외하고 1792Mi 로 설정하면 2G로 뙇!


Dockerfile 에 Xms / Xmx 설정도 뙇!

ENTRYPOINT ["java","-Xms1024m","-Xmx1792m","-jar","/app.jar"]


WRITTEN BY
손가락귀신
정신 못차리면, 벌 받는다.

,


Oauth2.0 에서 Token 발급에 필요한 ClientId 와 SecretKey 생성하기.


ClientId


  • 일반적으로 길이 16~32자 16진수 문자열로 생성.
  • 모든 클라이언트에서 고유함.


SecretKey


  • 일반적으로 길이 32~64자 16진수 문자열로 생성.
  • TimeStamp / UUID 라이브러리 등은 지양.
  • 일반 암호와 동일하므로 DB 에는 암호화 되거나 해시된 버전으로 저장.


ClientId ex)


Foursquare: ZYDPLLBWSK3MVQJSIYHB1OR2JXCY0X2C5UJ2QAR2MAAIT5Q
Github: 6779ef20e75817b79602
Google: 292085223830.apps.googleusercontent.com
Instagram: f2a1ed52710d4533bde25be6da03b6e3
SoundCloud: 269d98e4922fb3895e9ae2108cbb5064
Windows Live: 00000000400ECB04
Okta: 0oa2hl2inow5Uqc6c357


Client Id / Secret Key 생성


commons-lang3 의 RandomStringUtils 를 사용하여 특정 길이의 랜덤한 문자열을 생성할 수 있다.


dependencies {
    implementation 'org.apache.commons:commons-lang3:3.12.0'
}

...

RandomStringUtils.randomAlphanumeric(32));  
// 1JhGTHmGlCP037aATyJzph983FRl5r14
RandomStringUtils.randomAlphanumeric(64));  
// 84ldr2jaagfMiIwzj2wFnaPxXBV2Yc9WC1AbJPaugEj5qHSWHkPjt2HInLdlzV7S


spring-security 를 사용할 경우, SecretKey 를 한번 더 암호화 하기 위해 BCryptPasswordEncoder 클래스를 사용한다.


PasswordEncoder passwordEncoder = new BCryptPasswordEncoder();
String encodeKey = passwordEncoder.encode(secretKey);


PasswordEncoder.encode 는 항상 랜덤키를 생성하기 때문에 인코딩된 결과끼리의 비교는 불가능하지만, secretKey 와 encodeKey 의 비교는 가능하다.


if (passwordEncoder.matches(secretKey, encodeKey)) {
    System.out.println("matching~");
}


WRITTEN BY
손가락귀신
정신 못차리면, 벌 받는다.

,

jOOQ gradle 설정

Programming/Jooq 2021. 11. 25. 02:12

jooq


jOOQ 는 데이터베이스로부터 Java code 를 생성하여 Typesafe (SQL 구문 오류가 없는) 쿼리를 사용할 수 있다.


jooq 설정시 maven 을 사용한다면 사이트 메뉴얼을 참조하면 될 것이고, gradle 을 사용한다면 두가지 선택지가 있다.


Running the code generator with Gradle

Anything else you'd like to tell us? How did you hear from jOOQ? What made you try jOOQ? What are your expectations?

www.jooq.org


GitHub - etiennestuder/gradle-jooq-plugin: Gradle plugin that integrates jOOQ.

Gradle plugin that integrates jOOQ. . Contribute to etiennestuder/gradle-jooq-plugin development by creating an account on GitHub.

github.com


programmatic 설정은 왠지 간단해 보였는데 code generate 는 실패했다.ㅋㅋ; 어쨌든 공식 사이트에서도 서드 파티 플러그인을 추천하니 어쩔수 없이...


Spring Boot + Jooq + Mysql 로 테스트 했지만, 아래에 Spring Boot 관련 라이브러리는 대부분 제외했다. Spring Boot 연동도 문제없음.


1. dependency 설정


build.gradle - jooq 로 자바 코드를 생성하고 DSL 을 사용하는데 필요한 plugin 과 DB 커넥터 추가. 


// Jooq / Mysql connector
plugins {
    id 'java'
    id 'nu.studer.jooq' version '6.0.1'  // gradle-jooq-plugin
}

sourceCompatibility = '11'

repositories {
    mavenCentral()
}

dependencies {
    runtimeOnly 'mysql:mysql-connector-java:8.0.25'
    jooqGenerator('mysql:mysql-connector-java:8.0.25')
}


2. Code generation 설정


org.jooq.codegen 으로 DB 의 테이블에 매핑되는 클래스를 생성하도록 설정이 필요하다. JDBC 설정부터 DB의 어느 테이블을 클래스로 변환하고 제외할 것인지 상세하게 설정할 수 있다. codegen 으로 생성된 클래스로 DSL 질의를 실행할 수 있다. build.gradle 에 이어서 추가...


jooq {
    version = '3.15.1'  // default (can be omitted)
    edition = nu.studer.gradle.jooq.JooqEdition.OSS  // default (can be omitted)

    configurations {
        main {  // name of the jOOQ configuration
            generateSchemaSourceOnCompilation = true  // default (can be omitted)

            generationTool {

                logging = 'WARN' // TRACE, DEBUG, INFO, WARN, ERROR, FATAL
                onError = 'LOG'  // FAIL, LOG, SILENT

                jdbc {
                    driver = 'com.mysql.cj.jdbc.Driver'
                    url = 'jdbc:mysql://example-db-cluster.cluster-clas4lq5kfel.ap-northeast-2.rds.amazonaws.com:3306/portal'
                    user = 'user'
                    password = 'password'
                    properties {
                        property {
                            key = 'ssl'
                            value = 'true'
                        }
                    }
                }

                generator {
                    name = 'org.jooq.codegen.DefaultGenerator'
                    strategy {
                        // org.jooq.codegen.KeepNamesGeneratorStrategy - DB 네이밍 유지: 언더바, 대소문자 등... 기본값은 PascalCaseNames
                        name = 'org.jooq.codegen.DefaultGeneratorStrategy'
                    }
                    database {
                        // https://www.jooq.org/doc/3.15/manual/code-generation/codegen-advanced/codegen-config-database/codegen-database-name/
                        name = 'org.jooq.meta.mysql.MySQLDatabase'
                        inputSchema = 'portal'

                        includes = '.*' // 정규표현식
                        excludes = 'test_.* | temp_.*'
                    }
                    generate {
                        generatedSerialVersionUID = 'CONSTANT'
                        javaTimeTypes = true    // java.time.*

                        deprecated = false
                        records = true
                        immutablePojos = true
                        fluentSetters = true
                    }
                    target {
                        // packageName = 'nu.studer.sample'
                        packageName = 'com.example.api.jooqgen'
                        // directory = 'build/generated-src/jooq/main'  // default (can be omitted)
                        directory = 'src/main/java'  // default (can be omitted)
                    }
                }
            }
        }
    }
}


공식 예제에서 약간의 내용만 바꿨다. 눈치채지 못할 만큼...ㅋ DB 로부터 Java code 를 생성하기 위한 스크립트이기 때문에, jooq 버전, DBCP 설정도 들어가고, 생성 전략, 코드 생성할 디렉토리 등등... 조금 길어보이긴 하지만 별거 없다. 만약 DB 스키마가 이미 존재한다면 여기까지 하고 generateJooq 태스크를 실행하면 설정한 디렉토리에  Java 클래스들이 생성되는 것을 확인할 수 있다. 별 문제가 없다면...


3. DSL 테스트


portal.account 테이블에 id, email 이 있다 치고, entity, controller 대충 만들고 DSL 로 쿼리 뽑기.


package com.example.api;

import com.example.joooq.gen.tables.Account;
import org.jooq.DSLContext;
import org.jooq.impl.DSL;
import org.springframework.stereotype.Repository;

import java.util.List;

@Repository
public class AccountRepository {
    private final DSLContext dsl;

    public AccountRepository(DSLContext dsl) {
        this.dsl = dsl;
    }

    public List<Account> getList1() {
        return dsl.select(DSL.field("id"), DSL.field("email"))
                .from(DSL.table("account")).fetchInto(AccountEntity.class);
    }

    public List<Account> getList2() {
        return dsl.select(Account.ACCOUNT.IDX, Account.ACCOUNT.EMAIL)
                .from(Account.ACCOUNT).fetchInto(AccountEntity.class);
    }
}


뙇!

getList1 의 쿼리 결과가 잘 나온다면 DB 연동이 잘 된것이고,

getList2 의 쿼리 결과가 잘 나온다면 생성된 jooq 코드가 잘 연동된 것이고.


* 연동 후기


처음에 programmatic 방식으로 접근했다가 codegen 에 실패했는데... 에러도 안나고 뭐... 그래서 plugin 방식으로 설정을 마쳤다. spring 이고 jooq plugin 이고 다 최신버전으로 설치했는데, jooq 버전을 비롯하여 중간중간 중복된 라이브러리들이 많이 거슬렸다. 가이드를 보고 spring 의 dependency-management 와 버전을 맞추면 해결된다.


jooq 3.15 버전부터 R2dbc 라이브러리가 추가되서 자동구성시 제외하려면 추가.


@SpringBootApplication(exclude = {R2dbcAutoConfiguration.class})


target directory 이슈... codegen 에서 기본 타겟 디렉토리는 build/generated-src/jooq/main 이며 모든 개발자가 각각 빋드하여 코드를 생성해야 한다. 이를 소스셋(src/main/java) 로 변경한다면 버전관리가 가능할 수 있지만 해당 디렉토리를 삭제하고 generate 하기 때문에 target 디렉토리를 src/main/java 로 했다가는 그 안의 소스 패키지가 빌드할 때마다 다 날아간다. 이를 막기 위한 옵션으로 clean 속성을 제공하기는 하나, 정작 해당 값을 false 로 지정하면 에러가 발생한다.


generator.target.clean must not be set to false. Disabling the cleaning of the output directory can lead to unexpected behavior in a Gradle build.


기본값대로 build 디렉토리를 이용하거나, 만약 소스가 포함되지 않은 별도의 타겟 디렉토리 구성이 필요하다면 독립된 디렉토리나 별도의 모듈에 추가하는 것을 추천한다.


WRITTEN BY
손가락귀신
정신 못차리면, 벌 받는다.

,

Spring Boot REST API 프로젝트에 API 문서 자동화 툴로 뭘 써야 하나...


Swagger vs Spring rest docs


  • Swagger - 적용 난이도 쉬움, 이쁜 UI, API 테스트 기능, 코드 기반
  • Spring rest docs - 적용 난이도 보통, 단순 UI, 테스트 기반


장단점이 분명하지만, 내부용으로 후딱 만들어 쓸 것이라면 Swagger. 외부에 제공해야 한다면 정갈해 보이는 Spring rest docs 이 아닐까 싶다.


문서화를 위한 gradle 구성


  • Step 1. 코드 테스트 -> 에러가 발생하지 않으면 해당 api 내용(snippets: asciidoc 파일) 생성.
  • Step 2. Test 로부터 생성된 snippets 을 import 하도록 api 문서 템플릿(asciidoc 파일) 을 생성하고 빌드하여 API 문서(html) 완성.
  • Step 3. 생성된 html 파일을 외부에 노출하도록 static 디렉토리에 복제.


plugins {
    id 'org.springframework.boot' version '2.5.6'
    id 'io.spring.dependency-management' version '1.0.11.RELEASE'
    id 'java'
    // gradle 7 이상은 org.asciidoctor.convert 대신 org.asciidoctor.jvm.convert 사용
    id 'org.asciidoctor.jvm.convert' version '3.3.2'  // Step 1
}

group = 'com.example'
version = '0.0.1-SNAPSHOT'
sourceCompatibility = '11'

bootJar {  // Step 3
    dependsOn asciidoctor
    copy {
        from "${asciidoctor.outputDir}"
        into "${sourceSets.main.output.resourcesDir}/static/docs"
    }
}

asciidoctor {  // Step 2
    sourceDir 'src/main/asciidoc'
    attributes \
        'snippets': file('build/generated-snippets')
}

repositories {
    mavenCentral()
}

dependencies {
    implementation 'org.springframework.boot:spring-boot-starter-web'
    testImplementation 'org.springframework.restdocs:spring-restdocs-mockmvc'  // Step 1
    testImplementation 'org.springframework.boot:spring-boot-starter-test'
}

test {
    useJUnitPlatform()
}


이 build.gradle 파일은 가장 기본적인 세팅이므로 추후 익숙해지면 task 를 통합하거나 build 경로를 수정하여 커스터마이징 해서 편하게 쓰면 되겠다. 예를 들면...


asciidoctor {
    dependsOn test
    sourceDir 'src/main/asciidoc'
    outputDir "${sourceSets.main.output.resourcesDir}/static/docs"
    attributes \
        'snippets': file('build/generated-snippets')
}


3개의 task (단위 Test - html 생성 - html 복사) 를 하나로 통합한 예...


아무튼 build.gradle 파일을 수정했으면 JUnit 와 MockMvc 를 사용하여 Test 를 작성한다. (model, controller 생략)
MockMvc, REST Assured 중 서버 구동없이 컨트롤러 단위 테스트가 쉬운 MockMvc 를 사용한다.


@WebMvcTest(TestController.class)
@AutoConfigureRestDocs(outputDir = "build/generated-snippets")
public class TestControllerTest {

    @Autowired
    private MockMvc mockMvc;

    @Test
    public void test() throws Exception {

        mockMvc.perform(RestDocumentationRequestBuilders.get("/book/{id}",1).accept(MediaType.APPLICATION_JSON))
                .andDo(print())
                .andExpect(MockMvcResultMatchers.status().isOk())
                .andDo(document("book",
                        pathParameters(
                                parameterWithName("id").description("book unique id")
                        ),
                        responseFields(
                                fieldWithPath("id").description("book unique id"),
                                fieldWithPath("title").description("title")
                        )
                ))
                .andExpect(jsonPath("$.id", is(notNullValue())))
                .andExpect(jsonPath("$.title", is(notNullValue())));
    }
}


* 아래 에러 발생시:
urlTemplate not found. If you are using MockMvc did you use RestDocumentationRequestBuilders to build the request?

> pathParameters 을 사용할 때는 MockMvcBuilders.get 대신 RestDocumentationRequestBuilders.get 사용


Test 코드에서 document(identifier, ...) 에 기반하여 snippets 의 내용을 구성하게 되며, andExpect 에서 에러가 발생하지 않으면 outputDir 에 snippets 들이 생성된다.


curl-request.adoc
http-request.adoc
http-response.adoc
...


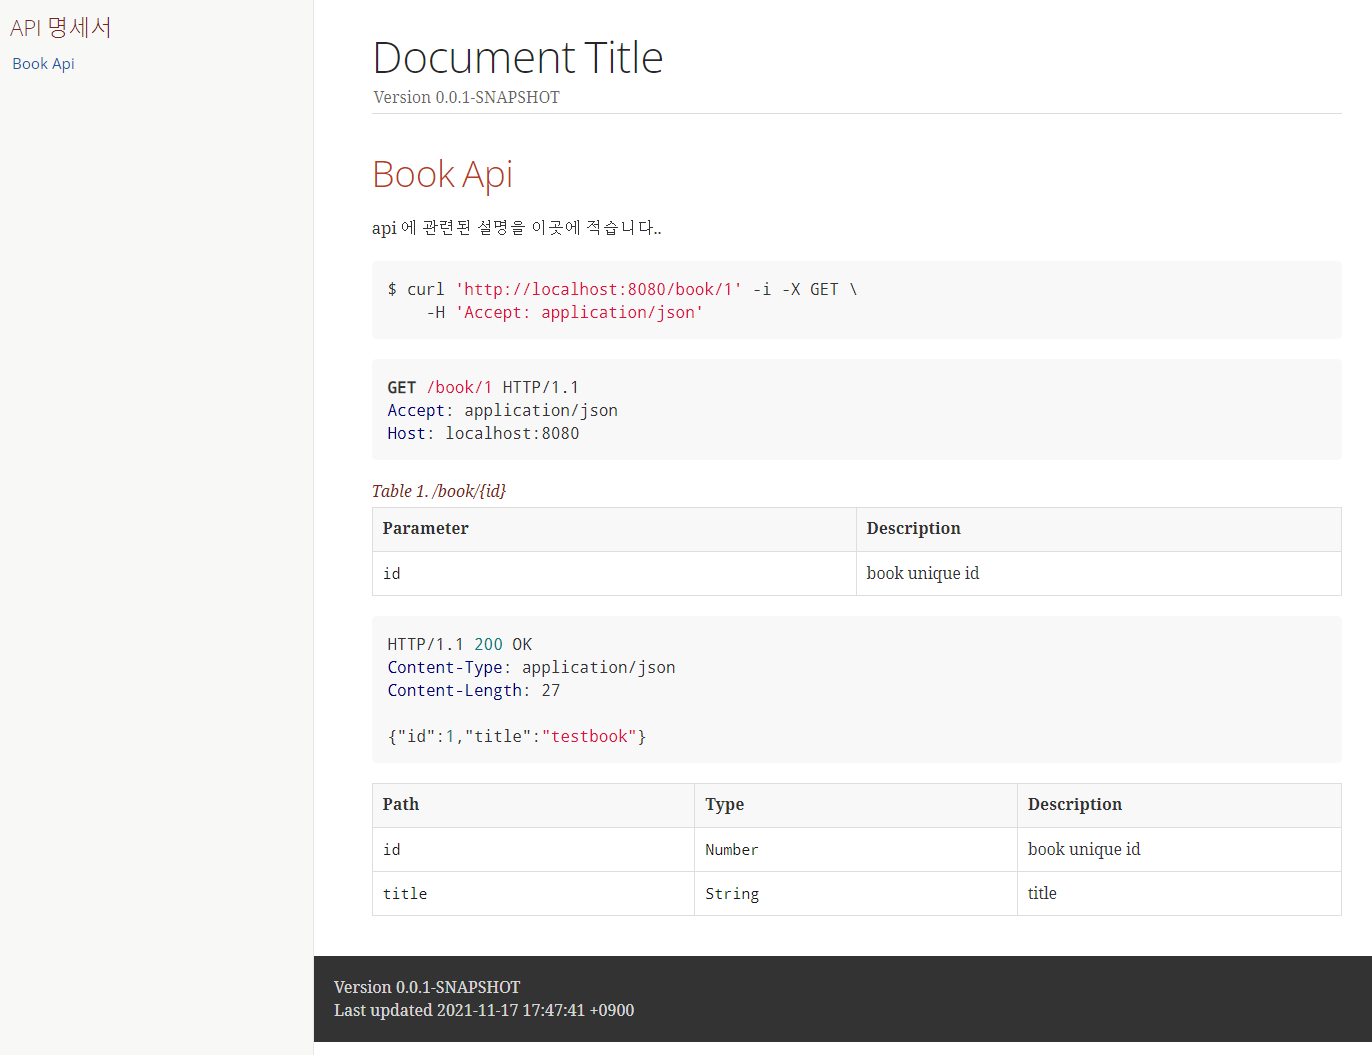
정상적으로 생성됐다면 이 snippets 들을 불러올 템플릿 asciidoc 파일을 생성한다. (/src/main/asciidoc/)


= Document Title
:doctype: book
:icons: font
:source-highlighter: highlightjs
:toc: left
:toc-title: API 명세서
:toclevels: 4

[[api]]

== Book Api
api 에 관련된 설명을 이곳에 적습니다..

include::{snippets}/book/curl-request.adoc[]
include::{snippets}/book/http-request.adoc[]
include::{snippets}/book/path-parameters.adoc[]
include::{snippets}/book/http-response.adoc[]
include::{snippets}/book/response-fields.adoc[]


* asciidoc 파일 작성시 참고

https://docs.asciidoctor.org/asciidoc/latest/

https://narusas.github.io/2018/03/21/Asciidoc-basic.html


Asciidoc 기본 사용법

Asciidoc의 기본 문법을 설명한다

narusas.github.io


AsciiDoc Language Documentation :: Asciidoctor Docs

AsciiDoc is a lightweight and semantic markup language primarily designed for writing technical documentation. The language can be used to produce a variety of presentation-rich output formats, all from content encoded in a concise, human-readable, plain t

docs.asciidoctor.org


Spring REST Docs는 기본적으로 Asciidoctor 를 사용하지만, Markdown 을 사용할 수도 있다.

간략하게 이런식으로 작성하고 bootJar 를 실행하면 /build/docs/asciidoc/book.html 파일이 생성된 것을 확인할 수 있다.


spring-rest-docs


bootRun 을 실행하면 해당 파일이 /build/resources/main/static/docs 에 복사되며 http://localhost/docs/book.html 에서 확인 가능.


WRITTEN BY
손가락귀신
정신 못차리면, 벌 받는다.

,